
6 step water treatment
Make Dangerous water drinkable
During an Emergency, especially one in which city services have been indefinitely interrupted, you should treat your water as though it is extremely contaminated.
Yes, even if it looks ok.
Clear water is no indication of safety. You will not be able to thoroughly test drinking water without a professional lab, thus In order to keep from getting sick, this process should be taken very seriously with no shortcuts.

C.h.u.s
This Treatment process is based on the CHUS method, using
1. CHEMICAL
2. HEAT
3. UV RADIATION
4. SODIS (SOLAR DISINFECTANT)
In this Process, each Step is Scalable, Renewable, and able to be individually serviced.
-
Scalable - Depending on the size of your family and amount of water needed
-
Renewable - Most components can be replaced or replenished in a grid-down scenario, and those that are not can be used properly so as to prolong its life and safe usability.
-
Individually serviced - Different parts of the system will need to be renewed, replenished or serviced at different rates. you should be able to access each step individually as needed. (see warnings about "black box" systems)
The order is important
Double-click on a step to jump to that section


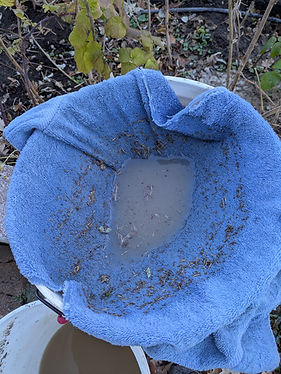
Sedimentation
step 1:
We're assuming you have managed to find "Wild Water" somewhere. But who knows what you have found...
Sedimentation – This one is easy. Be patient, and let the water have time to settle.
Scoop the cleaner water off the top into a new container.
- Reduces larger contaminants such as dirt, sand, algae etc. which you don’t want in your finer filters.
Use a settlement bucket
-
passive slow process
-
Patience pays - The longer you can wait, the cleaner water you will have to work with
-
Basic filter for DIRT, SILT, ALGAE ETC.
-
will NOT FILTER OUT PATHOGENS, BACTERIA, VIRUSES
-
can be scaled with more buckets


Use a flocculant
A flocculant in water treatment is a chemical (often a polymer) that causes tiny, suspended particles (colloids) to clump together into larger, heavier masses called "flocs," making particles settle out or filter out easily. This clarifies water by removing cloudiness (turbidity) for cleaner drinking water treatment.
Alum - is a common household product you may find in your spice cabinet for pickling. Alum is a coagulant which neutralizes the negative charges on particles, allowing them to stick together into small clumps (micro-flocs).
Adding 1 tsp/5 gallons will help clear a muddy bucket. I've used this to great effect camping in areas with muddy water, such as on the Green River.


pre-filter
step 2:
- Reduces contaminants such as clay, dirt, sand, algae etc. which you don’t want in your finer filters.
-
PASSIVE SLOW PROCESS
-
BASIC FILTER FOR DIRT, SILT, ALGAE ETC.
-
SCALE AS NEEDED
-
WILL NOT REMOVE PATHOGENS
I recommend a cloth filter
If your water has floaties - use an old towel or sieve to GET THOSE OUT! you do not want them clogging your filters. Steps now will save you lots of effort later and prolong the life of your filters.
Use a cloth wick
A cloth can move water through a capillary action siphon, also known as a wick system. This method uses the absorbent properties of the cloth to draw water from one container to another, provided the receiving container is lower than the source. This is a passive, slow process driven by the cloth wicking water upward against gravity, and can also act as a basic filter, though it will not remove pathogens.
- scale as needed by using more cloths and buckets
- be sure to keep these open buckets free from additional contaminants such as dust, leaves or animal hair in the environment where you are filtering.

step 3:
Sediment Filter
Coarse filter with some Absorption
(Larger visible particles like dirt, silt, sand, rust, and scale).
This many-layered filter should make the water look as clean as possible, removing turbidity which will interfere with important filtration in next steps. Ideally, this water comes out looking pretty clean to the naked eye
why are pre-filters so vital?
IF YOU DON’T PRE-FILTER:
-
ABSORBERS ARE SPENT
-
CHEMICALS ARE INEFFECTIVE
-
UV RADIATION CAN’T PENETRATE
-
FILTERS WILL PLUG IMMEDIATELY
THIS IS A MUST, YOU CAN’T CHEAT ON THIS ONE.
layers in a sediment filter
-
PEA GRAVEL - catches algae, dirt particles, large debris
-
FINE GRAVEL - or crushed volcanic rock etc.
-
ANTI-MICROBIAL PLANTS - Thyme, Pine Needles, Resin, Juniper, Mugwort, Hops, White Willow, Rosemary, Burdock, Yarrow (Don’t leave these to rot - renew regularly)
-
CORSE SAND
-
FINE SAND
-
ACTIVATED CHARCOAL or *Pyrolysis produced charcoal (Absorber)
Each layer should be kept separated with either a simple scrap of cloth, or even their own bucket or they will just sift into each other. (cloth with no dyes or chemicals - such as Cotton)

The Sediment filter mainly works by providing surface area to catch foreign bodies. make layers as thick as possible.
-
Top Layers will need to be Renewed/rinsed/cleaned/replaced more regularly
-
The life of your filter is dependent on the filthiness of your water. if you are dealing with clean water, expect to renew your filter at least monthly. Weekly or bi-weekly may be necessary if dirty.
-
The Charcoal layer filters by absorbing contaminants. it is microscopically porous It cannot be renewed once used up - Dispose of away from garden areas as it can contain heavy metals and dangerous chemicals that it has filtered out.
-
Make sure water isn’t just running down the edges of the bucket and bypassing your sediment layers.
-
Keep water in contact with Charcoal layer as long as possible as it only filters by passing through the charcoal’s micro cavities.
-
Don’t let dirty water poured in the top spill down the outside or splash into your clean water.

This is my favorite video on making a sediment filter in a 5 gallon bucket.
.jpg)


PYROLYSIS PRODUCED CHARCOAL

You can’t make activated charcoal at home because it requires extreme, controlled industrial conditions (600-1200 deg C, steam/chemicals) to create the vast network of pores needed for absorption, something a regular oven or campfire can’t achieve.
2nd best option:
Pyrolysis made charcoal can be made at home and while not as absorptive as activated charcoal, it is renewable and still can act as an absorber in water purification.
It is made by cooking Hard wood in a low oxygen environment. There are many videos and instructions online to learn how to make pyrolysis charcoal with basic equipment like a Dutch oven.

.jpg)
Video on making your own PYROLOSIS or BIO CHARCOAL at home.

SODIS
step 4:
SOLAR DISINFECTION
Done properly, this process inactivates pathogenic microorganisms:
BACTERIA – (E.coli) ,
VIRUSES, and
PROTOZOA (parasites like cryptosporidium and Giardia)
-DOES NOT FILTER CHEMICALS

SODIS (Solar Disinfectant) uses the Sun’s UV rays and heat to effectively kill Viruses, Bacteria and Parasites in clear Plastic (PET) bottles.

-
Sunlight heats the water to temperatures over 122deg - boosting the purification process, killing heat-sensitive pathogens.
-
UV radiation damages microbial DNA killing pathogens
-
Will NOT WORK if water is cloudy/Turbid. Water MUST be PREFILTERED.
-
You have to track Solar time and UV density
Bright Sunlight - 6 hrs
Cloudy or overcast - 2 days
SODIS is a recognized and valuable strategy for providing safe drinking water in resource-constrained settings…It is recommended by WHO and UNICEF. for further information, see Sodis.ch website for extensive resources.
SODIS Steps
-
STEP1) - Pre-Filter: Pre-filter water until it is not turbid or cloudy - you should be able to read text through it easily. Any turbidity will shadow dangerous pathogens from UV rays.
-
STEP 2) - Prepare and fill Bottles - Bottles should be PET plastic and not too big. remove any labels, stickers etc. don’t use ones that are heavily scratched or scuffed. Glass can also be used but is more breakable.
-
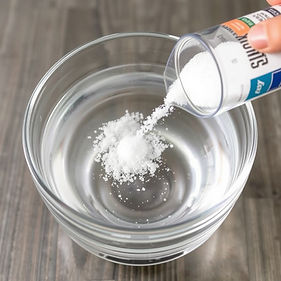
STEP 3) Optional, add salt*
-
STEP 4) Oxygenate - Shake vigorously for 30 seconds to oxygenate the water
-
STEP 5) Lay out Flat in the direct sun - to increase sun’s effectiveness, lay on metal or a reflective material.
-
STEP 6) TIME - Time to disinfect is 6 hrs when sunny. 2 consecutive days if cloudy. not effective if continuously raining.

.jpg)
sodis method can be made particularly effective by increasing the heat
- Use a Solar oven to increase temperatures. a box solar oven can easily reach 200 deg F.
an insulated one can reach 350 degF or higher.
- using insulation such as a car sun shade/shield, black cloth or metal behind the bottles increases heat
- this can be made very effective even in winter by placing inside the front window of a car - make sure it is facing the direct sun -
keep bottles small so there is less water to heat
If it is cold (winter) the UV rays will inactivate bacteria and viruses, but give adequate exposure to full sun.
HEAT NEEDED FOR PROTOZOA


Consider a WAPI - Water Pasteurization Indicator
This is a simple tool in which wax melts at 149degF indicating that the water has reached Pasteurization temperatures.
While Solar Ovens rarely reach boiling temperatures, you can see from the chart that pathogens can also be killed at this lower temperature if the temp is maintained long enough for the wax to melt. This is convenient so that you don't have to constantly check and monitor the thermometer in your solar oven to wonder if it got hot long enough.

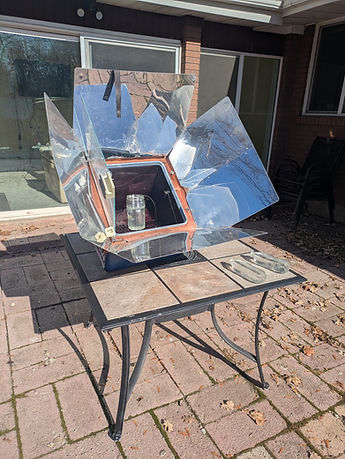


My WAPI proved much more reliable than my Solar Oven thermometer. It ready 200degF internal temperature when my water was nowhere near that hot. It wasn't until the WAPI wax melted that I knew the water had reached safe pasteurization temperatures.
This test was run in mid January in Utah 2026. The outside temp was just above freezing, but the sun was bright.

CHEMICALS
STEP 5:
Chemical disinfection
Calcium hypochlorite (pool shock) – Neutralizes harmful microorganisms like:
BACTERIA
VIRUSES
ALGAE
FUNGI
by breaking down their cellular walls.
This will NOT kill protozoa
.jpg)
Only a tiny amount of DRYTEC is needed to adequately treat drinking water
AMOUNTS:
Desired PPM (Parts Per Million) for 5 Gallons of water
For Tap Water 1PPM = 0.003 grams / 5gal
For Moderately contaminated water 5ppm = 0.15 grams = 1/32 teaspoon
For Highly contaminated water 10ppm = 0.29 grams = 1/16 teaspoon
Municipal tap water generally contains approximately 1–2 ppm of chlorine, swimming pools 3–5.
INSTRUCTIONS:
Treat the water in a container with a tight fitting lid. Let the water stand for 30 minutes at room temperature. For colder temperatures let the water stand longer as the reaction of chlorine is slower in colder water.
After 30 minutes you want to be able to smell a faint chlorine odor, otherwise more should be added and allowed to stand for 30 minutes or more depending on the water temperature. Use the sniff test to determine if there is residual chlorine at the end of the processing time, this ensures that sufficient chlorine was used to neutralize pathogens and organic contaminants. If you can't smell any chlorine at the end of 30 minutes then that means the chlorine was all used up and you will need to treat again. you should only faintly be able to smell chlorine at the end of 30 min.

CAUTION:
POOL SHOCK
DO NOT:
-
SPILLS - DO NOT VACCUM OR USE WATER - for spills, wear gloves and a mask and gently sweep up dry without flicking particles or dust into air or other areas of the room.
-
NEVER - add water to the powder. Powder can be added to water, not the reverse
-
STORE OR MIX - with other chemicals, such as ammonia - this is deadly. don't store in a cabinet or under the sink with ammonia.
-
DONT STORE IN ORIGINAL PACKAGING - it will degrade and out gas to corrode nearby metals - Use high density HDPE plastic or glass - no rubber or metal or ziplocs.
.jpg)
.jpg)

carbon block filter
step 6:
filters through absorption
Removes Chlorine, other chemicals and improves taste and odor.
a 3.0 micron filter can block Parasite Eggs
carbon flters
A Carbon filter removes chemicals through the process of Absorption.
It improves the taste of purified water as a final step in the multi-step process.
It is mostly filtering out the chlorine used in prior steps to kill viruses and bacteria. this amount of chlorine is not harmful short term, but it is more desirable to filter out long-term. This filter overall improves the taste of the water.
- "Silver Infused" is recommended as this prevents bacteria or algae from growing inside the moist filter

important
IMPORTANT
-
FEMA does not advise Filters in emergencies because they are ineffective if not used properly.
-
Your filter, no matter how expensive, can be ruined with one improper use. If dirty water is put through, it will clog.
-
DO NOT FREEZE this filter must never be allowed to freeze or it will not be able to filter safely. any moisture (from air or previous use) will expand when frozen, creating micro fractures which you cannot see - but which disable the function of this filter.
-
This Filter is not renewable and is usually the most expensive component of your filter process. It should be maintained and used properly to extend its life as long as possible.
-
Block Filters are fragile and will break (mini invisible fractures) if dropped or packed/stored improperly - cushion in transport
-
Block filter screw ends are also fragile and can be easily stripped or snapped off - handle gently and only finger tighten

This last step Using a Carbon Filter is primarily for chemicals, but a 3.0 micron filter can also catch Parasite eggs which are relatively large but have thick walls and are harder to kill with the previous steps.
Block filters in a series can also be used to increase safety, but these filters must always come at the end of the filter process and in proper series (biggest first, smallest last)
-
5-10.0 Micron - catches sediments like sand and silt
-
5.0 Microns - Rust
-
1-2.0 Microns - Bacteria
-
0.5 Microns - Cryptosporidium, Giardia
-
Chlorine, bad tastes and odors are absorbed regardless of physical pore size.
-
DOES NOT FILTER VIRUSES (which are extremely small)

what to look for in a carbon filter
-
ABSOLUTE - An Absolute activated charcoal filter is certified to remove 99.9% or more of particles at a specified micron size.
-
NON-Absolute (Nominal) are usually cheaper and the filter offers a lower, approximate efficiency (typically 80-95%), which can vary with use. This means more baddies are going to be allowed through that will have to be dealt with by your body's immune system. If or how sick you will get depends on how contaminated your water is. Your body can handle a certain amount of baddies, but stress or a weakened immune system will decrease your resilience.
-
If it is not specified, a filter is usually NON-Absolute.
-
SILVER INFUSED - is recommended, because it cuts down on bacteria growing within the moist filter itself.
-
-
-
-
whether using 5 gal buckets or a more expensive stainless steel "Berkey" style - be cautious of splashes or drips from the top contaminating your clean water below. build skirts or guards with tape etc. if drips occur. Some brands are better designed with these real-scenario issues in mind than others.
-
if you want to test if your filter is still effective, red food coloring added to water in the top reservoir should be filtered out and not seen in the reservoir below.


This is a water sample collected from Hobble Creek near my house in January. within 2 days I grew a bacterial culture of Ecoli and possible Salmonella.
Making your kit
Want to know what this kit actually looks like? or want to make some for friends and family?
Click here for details and resources linked to the Bucket kits assembled for this class.
