
Making your kit
a 6-step water purification Bucket


Our
Goal
The Stake's aim for this class was to have every participant who signed up, walk away with the necessary physical assets to successfully purify contaminated water.
The Bucket assembled and available to those who signed up had each of the 6 steps representative with detailed instructions and notes printed out and laminated or in a plastic sleeve.
with each step represented, it would then be up to an individual's responsibility to scale and prepare appropriately for their specific scenario, family and situation.
This kit is just intended as a first step to getting someone started, not as a complete parachute that you are relying on to save your life in an emergency.
Practice and familiarity with the tools and knowledge discussed in the class are essential.
It is our goal that each individual and Family study out and actively prepare to live providently now and be able to provide and protect their family later. While this site and presentation is a resource, it is the responsibility of individuals to ensure they are adequately prepared and to define what that may mean for them.

6-step-bucket contents
Please Note, the Prices listed here are just baseline and what I paid when assembling 20 buckets, paying bulk prices. These prices are likely to increase significantly if buying items singly and to adjust for inflation. Links to what I bought can be found further down the page.
-
We decided to only do 4 buckets for the class.
-
Bucket for Sediment filter (holes drilled in bottom)
-
Catch bucket with Spigot under sediment bucket (Holes drilled in lid and hole drilled for spigot)
-
Bucket for Carbon block filter (Hole drilled for Carbon filter)
-
Catch bucket with carbon block filter (Hole in lid for filter) - 2nd spigot optional.
-
The idea was that the other buckets needed for other steps in the purification process could be any handy container. these were the buckets that should be prepared ahead of time with the proper holes drilled etc.
-
-
One (1) tea towel - for cloth wick and filter
-
One Spigot
-
Five (5) natural fiber cloth bags (18x20in) which can fit around the lip of a bucket and to hold each of the sediment layers for easy cleaning and renewal.
-
While only 4 sediments are provided, the 5th bag is intended for antimicrobial herbs or an additional layer of sediment of the person's choice.
-
-
Four (4) varieties of sediment, 6 Cups each
-
Pea Gravel
-
Corse Sand (no clay)
-
Silica Sand or fine quartz gravel
-
Coconut husk Activated charcoal
-
These sediments should ideally be rinsed and thoroughly & dried before storing for emergency use - but I was unable to logistically do this for 20 sets of buckets. rinse well (not into your kitchen sink or garbage disposal) and dry laid out in the sun or on a sheet in the oven at very low temp.
-
-
Square clear small water bottle - I provided Fiji water because I liked the square bottles - but any cheap plastic bottle will do - this is only to remind and represent this step as it will have to be scaled.
-
Glass Pint jar with heavy-duty plastic lid to store 1lb of DRYTEC. Bottle is labeled and has precautions and instructions handout attached.
-
The actual DRYTEC chemical was not included in the bucket to avoid liability. However, a class participant had organized a bulk order ahead of time and those who wished could acquire the pool shock from them at the bulk discount or on their own.
-
One (1) silver infused carbon block filter - individually packaged.


The items listed above all fit comfortably in a 5 gallon bucket for easy storage, though some of the buckets acquired were smaller and did not fit as well.
Item Breakdown
Following is a list of links for each of the items I purchased for buckets for the class.
I prepared total of 20 buckets, keeping each under $65 - with the DRYTEC $70 total. This also meant I was able to price these buckets considerably cheaper than they would be if you were to make one singly, since I had bulk discounts.

Buckets
Must be Food Grade
5 Gallons with matching lid
Color optional
Walmart brand new is a little over $6 ($3.84 +$2.16 for lid).
I found large amounts of buckets available from bakeries and ice-cream shops For free or discounted (about $3 for bucket and lid) These were often listed on KSL.com or Facebook Marketplace.

Sediment
Bagged Pea Gravel can be found at Home Depot, Lowes or similar. $7-8.00 for 50LB
$1.63 /6 cups
Bagged Coarse Sand can be found at Home Depot, Lowes or similar. $7-8.00 for 50LB
$1.63/6 cups
Silica Sand was found at Home Depot. $10.42 for 50LB
$2.26/6cups

Activated Charcoal
Coconut husk is preferable. Sold by weight.
1 Cup charcoal weighs about 165g.
6 cups is 900g = about 2lbs
6 cups is pictured above
6 cups = $6.66

Cotton Bags
18x20 inches or bigger with drawstring. these just barely fit over a bucket with a bit of a stretch. Natural fibers preferable, but avoid chemicals or dyes.
I bought bulk 200pieces which gave 20 buckets 5 bags.
$1.66/bag x5 = $8.32

Kitchen Towel
Simple Kitchen Towel.
24 pack - $1.50 each

Spigot
usually come in 4pack
$2.75/ each
Found some on ebay too

Charcoal Filter
Silver Infused Charcoal Filter 3.0 microns
$13.50/count

Glass Jar and Plastic Lid
Pint Canning Jars
@walmart about $0.94 each
Plastic Canning Jar Lids
About $0.50 each

DRYTEC Calcium Hypochloride
$13.50 if bought singly, but only $5 each in 24 pack.

MISC. Items
Handout Prints (13+ pages)- $2
Sheet protectors - about $1
Binder clips
Ziploc Bags - $0.55 for 4
Drilling Holes in your Buckets
Here are just some tips for getting your buckets set up for immediate use. Its nice being able to drill your holes ahead of time with an electric hand drill.
Your Carbon block filter bucket
You can probably fit up to as many as 3-4 filters in a bucket to increase the rate of your output. when drilling these holes, be careful to get precisely the right size, the filters come with a rubber washer.
Note: these filter stems are very delicate and can be easily broken. only hand tighten the screws.
The RECIEVING bucket needs holes in its lid to accommodate the stems of these filters.


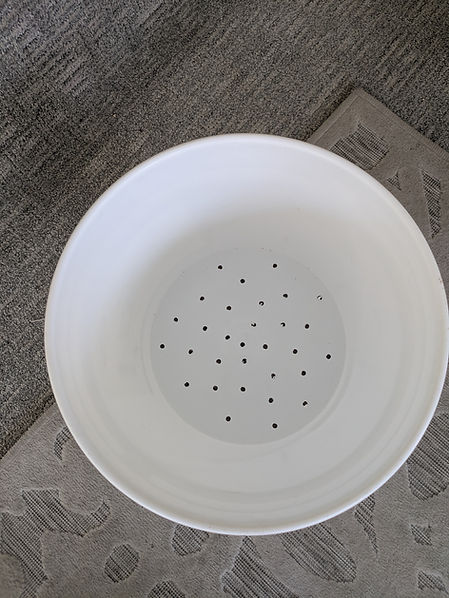
Your sediment filter bucket
Your sediment bucket needs holes drilled in the bottom to provide adequate drainage. It sits on another bucket and lid.
The RECIEVING bucket's lid needs to have enough holes to receive the water as fast as it comes out of the other bucket or you will have spillage.
CAUTION: the sediment bucket is also heavy, so you don't want to compromise the integrity of the lid with too much perforation.
Depending on your type of lid, be wary of pooling water that can't make it into the receiving bucket.

Adding a spigot
A spigot is convenient in any receiving bucket so that you can drain off that water without having to lift a potentially heavy bucket to do so.
I personally think the spigot is essential in the receiving bucket beneath my sediment filter because my filter is quite heavy and I have trouble lifting it.
I highly recommend a 2nd spigot on your carbon filter Receiver.
CAUTION: The spigots are fragile and will break if bumped or knocked about . I HIGHLY recommend unscrewing the spigot from the bucket and storing it safely inside for storage.
The Spigot comes with 2 Rubber washers. drill the minimum size hole for the spigot, not too big and hand tighten to prevent leaking.
you want the Spigot placed close to the bottom of the bucket, or it may sit above a small amount of water.
HOWEVER - don't drill too close to the bottom, you need about 1/2-1inches from the bottom for the nut on the inside to sit.

